Breath Awareness and Mindful Movement: Adaptive Yoga for Mobility
Week 2: Breath Awareness and Mindful Movement

Welcome back to Week 2 of our adaptive yoga series! Last week, we laid the foundation with basic poses that helped you start building body awareness. This week, we’ll focus on something even more essential to yoga: breath awareness.
Breathing is central to yoga because it connects the mind and body, allowing you to move with greater ease and mindfulness. In this week’s practice, we’ll focus on synchronizing breath with movement, helping to calm your mind and support your body through gentle yoga stretches. This approach can make each pose feel more fluid and natural, while also reducing stress and increasing focus.
In the following sections, you’ll learn how controlled breathing, also known as pranayama, can enhance your physical movements and promote relaxation. We’ll introduce a set of simple poses—such as Seated Cat-Cow and supported twists—that will improve your flexibility while keeping you grounded.
This week’s key focus is on integrating breath with movement. By the end of the week, you should feel more centered and in tune with your breath, preparing you for more dynamic movements in the weeks to come.
The Importance of Breath Awareness in Yoga
Breath is the foundation of any yoga practice, but it’s especially important in adaptive yoga. Controlled breathing, or pranayama, has the power to calm the mind, support the body, and create a deeper connection between the two. When you become aware of your breath, you can move with more mindfulness, making every pose feel more intentional and grounded.
In Week 2, we’ll focus on linking breath with movement. This simple practice not only improves focus and flexibility but also brings a sense of calm and relaxation to your entire body. Here’s how it works:
Inhaling to Expand: As you breathe in, think of creating space in your body. In poses like Seated Cat-Cow, you’ll inhale as you lift your chest or arch your back. This allows your body to naturally expand and lengthen, giving you more room to move and breathe deeply.
Exhaling to Soften: As you breathe out, allow your body to release tension and settle into the pose. In a seated twist, for example, you might exhale as you gently twist deeper. The exhale helps you soften and relax into the pose, making it feel more comfortable and grounded.
Finding Rhythm: One of the most powerful aspects of connecting breath to movement is the rhythm it creates. Think of each movement as a continuation of your breath. You inhale to move into a pose, then exhale to settle or deepen into it. This rhythmic flow of breath and movement helps make each pose feel more fluid and natural, reducing stiffness and increasing mobility.
Breathing this way also keeps your mind focused on the present moment. By paying attention to the rise and fall of your breath, you can prevent your mind from wandering, making your practice more meditative. Breath awareness acts like an anchor, keeping you present and connected to your body.
The beauty of connecting breath with movement is that it brings your practice to life. Every pose becomes more than just a stretch—it becomes a mindful experience that engages both body and mind. As you continue practicing this week, try to synchronize your breath with every movement. Notice how the breath gives you strength, stability, and calm, helping you feel more in tune with your body.

Yoga Poses for Week 2: Breath Awareness and Mindful Movement
This week, we’ll focus on poses that help you synchronize breath with movement (yogic breathing), while gently improving flexibility and mobility with different yoga poses. Each yoga pose is designed to allow for modifications, so you can adjust it to fit your body’s needs and abilities.
Seated Cat-Cow (Marjaryasana-Bitilasana)
Purpose: This yoga pose improves spinal flexibility and helps you connect your breath with movement, creating a gentle flow that relieves tension in the back and shoulders.
How to do it:
Sit on a chair with your feet flat on the floor, hip-width apart, and your hands resting on your knees.
Inhale as you arch your back gently, lifting your chest and gazing slightly upward (Cow Pose).
Exhale as you round your spine, tuck your chin to your chest, and draw your belly in (Cat Pose).
Repeat this flowing movement with your breath, inhaling into Cow Pose and exhaling into Cat Pose for 5-10 rounds.
Modifications:
- Use a pillow behind your back for extra support.
- Rest your hands on your thighs if placing them on your knees feels uncomfortable.
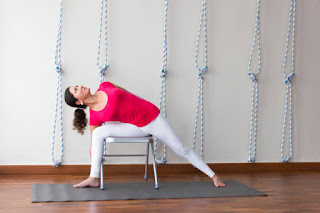
Seated Side Stretch
Purpose:
This yoga pose stretches the sides of your torso and improves lung capacity, allowing for deeper breathing. It also helps you link breath with movement by expanding the body on the inhale and relaxing on the exhale.
How to do it:
Sit tall with your feet flat on the floor and your hands resting on your thighs.
Inhale as you raise your right arm overhead, and gently bend to the left, keeping your left hand on your thigh for support.
Exhale as you soften into the stretch, feeling the length in your right side.
Hold for a few breaths, then inhale as you return to center. Repeat on the other side.
Modifications:
- If lifting your arm overhead is uncomfortable, place your hand on your hip and tilt gently to the side.
- Keep the movement small if you have limited mobility, focusing on feeling the stretch in your side.
Seated Twist (Ardha Matsyendrasana)
Purpose: This pose increases spinal flexibility and stimulates digestion, while encouraging mindful breathing as you twist. It helps to release tension in the back and shoulders.
How to do it:
Sit tall in your chair with your feet grounded.
Inhale deeply, and as you exhale, gently twist to the right, bringing your left hand to your right knee and your right hand behind you.
Hold for a few breaths, lengthening your spine with each inhale and deepening the twist with each exhale.
Inhale to return to center, and repeat on the other side.
Modifications:
- Keep the twist gentle if you have mobility limitations. A small, controlled movement is still effective.
- Use a pillow behind your lower back for extra support and comfort.
Seated Forward Fold (Paschimottanasana)
Purpose: This yoga pose stretches the lower back and hamstrings while promoting relaxation through breath control. It’s a great way to encourage a gentle release of tension.
How to do it:
Sit on the edge of your chair with both feet flat on the floor.
Inhale deeply, and as you exhale, fold forward from the hips, letting your arms hang down.
Relax your neck and back, taking slow, deep breaths as you rest in the fold.
Slowly rise back to a seated position as you inhale, stacking your spine one vertebra at a time.
Modifications:
- Place a bolster or pillow on your lap to rest your torso on for added comfort.
- If folding forward is challenging, rest your hands on your thighs and fold halfway.
Seated Shoulder Rolls
Purpose: This simple pose relieves tension in the neck and shoulders, improves posture, and helps synchronize breath with movement by encouraging mindful movement of the shoulders.
How to do it:
Sit tall with your arms relaxed at your sides.
Inhale as you lift your shoulders toward your ears, and exhale as you roll them back and down.
Repeat this movement for several breaths, focusing on the rise and fall of your shoulders with each inhale and exhale.
Modifications:
- If shoulder mobility is limited, make the circles smaller or focus on raising and lowering your shoulders in sync with your breath.
Seated Chest Opener
Purpose: This pose helps open the chest, improve posture, and encourage deeper breathing by expanding the lungs. It’s great for counteracting the effects of sitting for long periods.
How to do it:
Sit on the edge of your chair with your feet grounded.
Interlace your fingers behind your back, or hold onto the sides of the chair if clasping your hands is difficult.
Inhale as you lift your chest and gently pull your shoulder blades together.
Hold for a few breaths, allowing your breath to expand your chest, and release on an exhale.
Modifications:
- If clasping your hands behind your back is challenging, hold onto the back of the chair or use a yoga strap to gently open the chest.
These six poses are designed to help you connect your breath with your movements while promoting flexibility and calmness. Each pose can be modified to meet your needs, ensuring that the practice is accessible for everyone.

Synchronizing Breath with Movement
The key focus of this week is learning how to synchronize your breath with movement with yogic breathing. By doing so, you create a gentle rhythm that helps guide your body through each pose with ease. When your breath and movement are in harmony, your practice feels more natural and grounded, and you’re less likely to strain or push yourself beyond your limits.
Here’s how you can integrate breath awareness into your practice:
Inhaling to Expand:
Whenever you inhale, focus on creating space in your body. Think of lifting or expanding, whether you’re lengthening your spine, raising your arms, or opening your chest. For example, in Seated Cat-Cow, you’ll inhale as you lift your chest into Cow Pose, allowing your breath to guide the movement upward.
Exhaling to Soften:
As you exhale, allow your body to relax and settle deeper into the pose. The exhale helps release tension, making it easier to fold forward, twist, or round the spine. In Seated Twist, for instance, you’ll exhale as you rotate slightly deeper, using your breath to ease into the movement.
Flowing with the Breath:
Try to make your movements follow the rhythm of your breath. Each time you move into a pose, inhale to lift and expand, and exhale to settle and deepen. This flowing connection helps to center your mind and body, making each pose feel like a natural extension of your breath.
As you practice, pay attention to how your body feels when you synchronize your breath with movement. Notice how the breath supports your transitions between poses, helping you move with less effort and more mindfulness. If you find yourself holding your breath or losing the connection, gently bring your awareness back to the breath and start again. Remember, this is a practice, and it takes time to develop the habit of moving with your breath.
By focusing on the breath, you’ll also find that your mind becomes calmer and more present. The act of linking breath and movement creates a meditative flow, allowing you to stay focused on the present moment and release distractions.
Mindfulness and Breath
Breath awareness and yogic breathing is not only about physical movement—it also plays a crucial role in mindfulness. When you focus on your breath, you naturally become more present, grounded, and in tune with your body. This week’s poses are designed to help you cultivate a deeper connection between your mind and body, allowing you to experience yoga as a moving meditation.
As you flow through each pose, take a moment to observe how your breath affects your mental state. Are you feeling more relaxed, calm, or focused? When you synchronize breath with movement, you create a natural rhythm that can help quiet the mind and bring your attention fully into the present moment.
Here’s how to enhance mindfulness through breath:
Stay Present with Your Breath:
During each pose, focus on the sensation of your yogic breathing. Feel the inhale expand your chest and belly, and notice how the exhale relaxes your muscles. By staying aware of your breath, you keep your mind from wandering and maintain a steady connection to your practice.
Use Breath to Release Tension:
If you notice tension building in your body—whether it’s in your shoulders, neck, or lower back—try to soften it with your breath. Each exhale is an opportunity to let go of tightness and stress, helping you move deeper into relaxation.
Observe Your Mind:
At the beginning and end of your practice, take a few moments to observe your thoughts and emotions. Do you feel calmer or more centered after focusing on your breath? Breath awareness is a powerful tool for quieting mental chatter, creating space for a more peaceful and mindful experience.
The connection between mindfulness and breath goes beyond the yoga mat. By practicing breath awareness in yoga, you’re also training yourself to become more mindful in daily life. Whenever you feel stressed or overwhelmed, returning to your breath can help center your mind and bring you back to the present moment.
As you move through the poses this week, remember that yoga is as much about the mind as it is about the body. Let your breath guide you through each pose, and use it as an anchor to stay present and mindful throughout your practice.

Practice Tips for Week 2
As you continue your journey with adaptive yoga, I encourage you to approach this week with a sense of curiosity and self-compassion. Synchronizing breath with movement may feel new or challenging at first, but with consistent practice, you’ll notice how much it enhances your experience, both physically and mentally.
Here are a few tips to help you make the most of Week 2:
Start with Shorter Practices:
Just like in Week 1, begin with a short 5-10 minute session each day. This will give you time to focus on connecting your breath with your movements without feeling overwhelmed. Over time, as you feel more comfortable, you can gradually extend your practice to 15 or 20 minutes.
Practice Daily for Best Results:
Consistency is key when it comes to building a mindful yoga practice. Aim to do this sequence every day, even if it’s just for a few minutes. Daily practice will help reinforce the habit of linking breath with movement and allow you to feel more grounded and centered.
Find the Right Time of Day:
Experiment with practicing at different times of day to see what works best for you. Some people find that a morning practice helps energize them, while others enjoy a mid-day stretch or an evening session to wind down before bed. The beauty of yoga is its flexibility—find what fits your lifestyle and routine.
Listen to Your Body:
As always, listen to your body and move at your own pace. If a pose feels uncomfortable, modify it or take a break. The goal is to feel a sense of ease and flow in your movements, so avoid pushing yourself too hard.
Be Patient with Breath Awareness:
If synchronizing breath with movement feels tricky at first, that’s okay! It’s a skill that takes time to develop. Start by focusing on slow, deep breaths, and let the movement follow naturally. Over time, the connection between breath and movement will become smoother and more intuitive.
Remember, yoga is a personal journey, and there’s no rush to perfect anything. Enjoy the process, embrace where you are today, and allow your practice to evolve over time. By the end of this week, you’ll likely feel more centered, relaxed, and ready for the next step in your yoga practice.
Building Consistency in Adaptive Yoga: Reflect and Prepare for Week 3
As we wrap up Week 2, I encourage you to keep practicing these poses daily. By dedicating just a few minutes each day to your yoga practice, you’ll strengthen the connection between breath and movement, helping you feel more relaxed, centered, and in tune with your body.
Take a moment to reflect on how this week’s practice has affected you physically and mentally. Have you noticed any shifts in your focus, flexibility, or stress levels? Your breath is a powerful tool for calming the mind and supporting your movements, so let it guide you both on and off the mat.
I’d love to hear about your experience! Feel free to leave a comment below sharing your thoughts or any questions you may have about this week’s poses. Engaging with others in the community can help deepen your understanding and provide support as you continue your yoga journey.
Looking ahead to Week 3, we’ll be building on this foundation by introducing poses that focus on increasing strength and flexibility. Don’t worry—everything will still be adaptable to meet your needs, but you’ll find yourself gently challenged as we move forward. Stay tuned for more tips on how to modify and personalize your practice as we take the next step in our free yoga course.
I look forward to seeing you in Week 3!
Explore More on Adaptive Yoga
As you work through this series, I encourage you to explore some of my other articles on restorative yoga, which dive deeper into adaptive practices and the benefits of chair and restorative yoga:
- A beginners guide to Adaptable Chair Yoga
- Yoga therapy for Mobility and Rehabilitation: how to use chair yoga
- The Essentials of Restorative Yoga: Poses, Props, and Practices
- Integrating Strength, Flexibility, and Balance: Adaptive Yoga Flow
- Balance and Coordination with Adaptive Yoga: Gentle Practices for All Ages
- Flexibility and Range of Motion: Chair Yoga for Limited Mobility
- Core Strength and Stability: Adaptive Chair Yoga for Beginners
- Breath Awareness and Mindful Movement
- 6-Week Adaptive Yoga Course: Build Strength, Flexibility, and Balance